
Wild Game Cooking
Mixiotes Recipe – How to Make Mexican Mixiotes

As an Amazon Associate I earn from qualifying purchases.

Mixiotes (meesh-YOTE-es) are Mexico’s version of foods cooked in parchment. It’s an ancient, versatile way to cook. Here’s a recipe and some tips and tricks to make them at home.
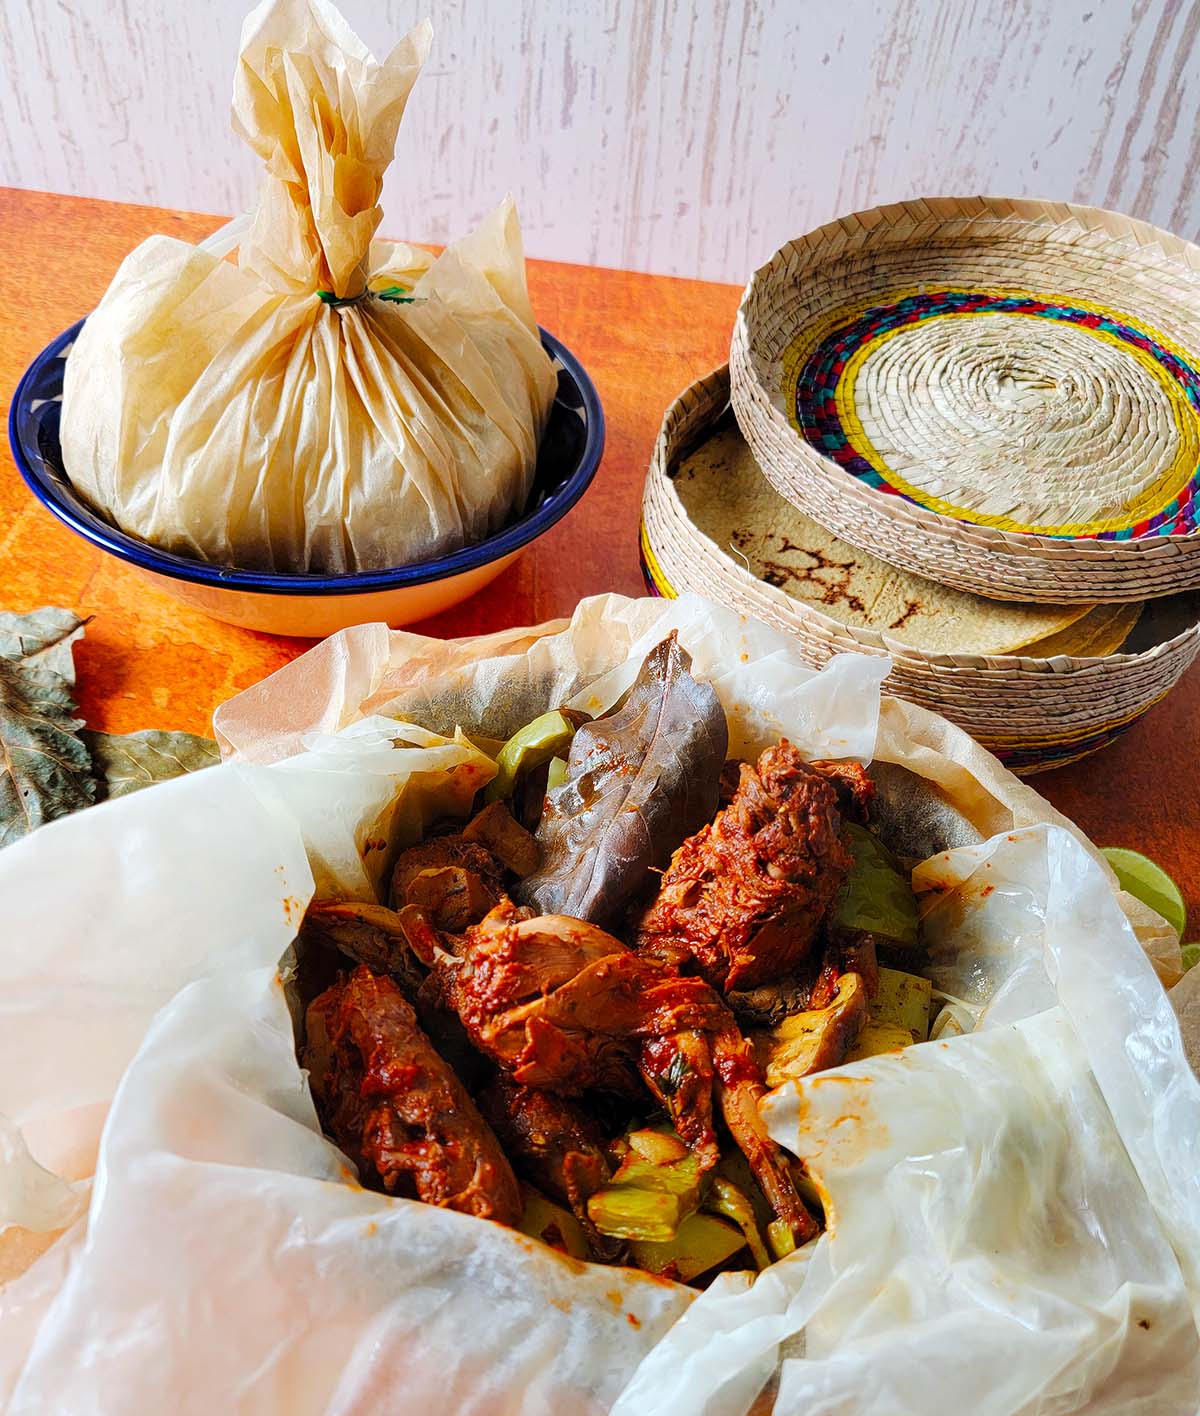
It is believed that mixiotes originated in central Mexico, in places like Hidalgo and Tlaxcala. The method predates the Spanish arrival, and may be thousands of years old.
It’s pretty wild, when you think about it: There’s a thin membrane on the inside of the giant leaves of the agave plant that you can pull off in one or two pieces if you are careful. Turns out this membrane is 1) flexible when wet, 2) dries well, and 3) imparts a lovely flavor to whatever is cooked inside.
Cooks would then tie the bundles up and steam them in pits along with things like tamales. When they’re ready to eat, you open the bundle, enjoy the aroma, and eat your mixiotes with corn tortillas.
The process remains popular in central Mexico, so much so that in many of the Mexican states there, it’s now illegal to harvest the hojas para mixiotes because stripping that membrane often kills the agave, which can take a dozen years of more to mature.
It’s a wonderful byproduct of mezcal or tequila making, however, so you can still find the hojas here and there. I found mine in the Hidalgo Market in Tijuana.
How to Make Mixiotes
Chances are you aren’t close to an actual market in Mexico, and I’ve never once seen hojas para mixiotes in a Latin market in the US. So what to do? Do what most Mexicans do and use parchment paper.
Parchment paper is the closest thing to the agave membranes, and I think it’s a better option than banana leaves, which I have seen used in Mexico, and definitely better than straight foil. I do not like using foil directly because it can leave a tinny taste. I do use foil as a second layer, however.
Generally speaking, making mixiotes is as easy as marinating your main item in an adobo, putting things in a wrapper, tying the wrapper and then steaming the bundles until what’s inside is cooked.
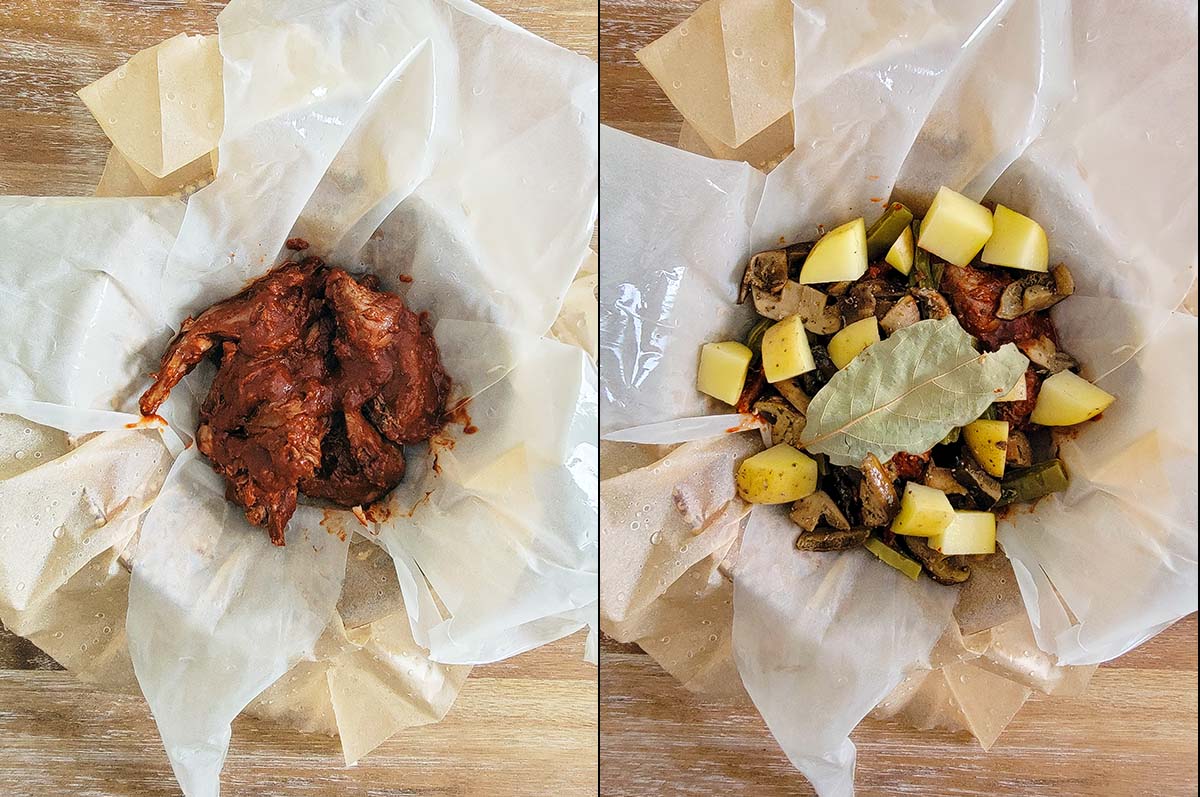
But like anything, there are wrinkles — mostly when one thing, usually the meat, takes a lot longer to cook than whatever else is in the bundle.
In this case, you par-cook the thing, meat, potatoes, etc., and then add it to the bundle to steam.
Endlessly Versatile
I’ve seen mixiotes recipes with damn near everything inside, from mushrooms and vegetarian options to fish, lamb, chicken, beef, and, most interestingly, lots of different kinds of game.
Because this method is so ancient, game remains a favorite for mixiotes. So I was overjoyed to see a recipe that used, of all things, squirrel! It’s tucked away in a book called Recetario de la Huasteca Hidalguense, and it’s a stripped down version of modern mixiotes.
I am using squirrel for these mixiotes, but don’t get all hung up on that. Chicken, turkey legs, rabbit, any white meat poultry like pheasant, grouse or quail will work with this recipe.
And use this method as a model for mixiotes with red meat or fish. Only the cooking times will vary.
You’ll want the meat or fish, plus interesting things to go with it, in your bundles. I suggest:
- Potatoes or another tuber. They show up a lot in mixiotes recipes.
- Nopales, pre-cooked to remove the mucilage. Here’s how to prep nopales for cooking.
- If you happen to see them in a Mexican market, peeled and quartered Xoconostle fruits, which are also very traditional. I know, esoteric, but hey.
- Onions and garlic, sliced, chopped or what have you.
- Definitely bay leaves, or better yet, dried avocado leaves, which are more traditional. You can buy avocado leaves online or in most MexiMarts.
- Mushrooms are a great option. Use any fresh ones you like, or, if by chance you have access to huitlacoche, a/k/a “corn smut,” use that.
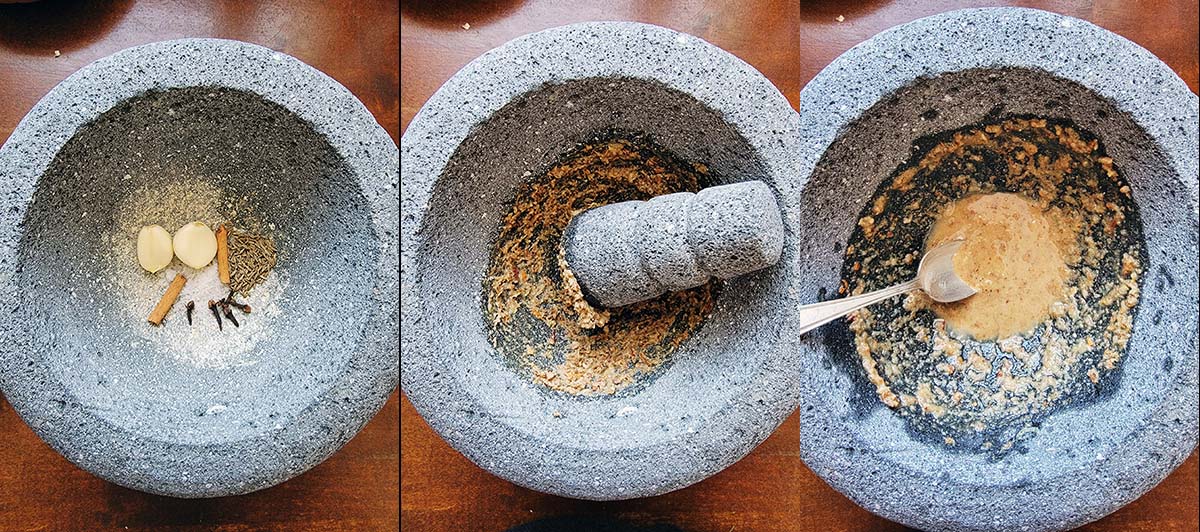
One tip that makes a difference is if you can crush the spice mix that goes into your adobo marinate. Crushing releases more aroma than grinding with a burr grinder, and mixiotes are all about aroma.
The adobo you use for the meat keeps for weeks in the fridge, so you can make it ahead. You can also marinate your meat for up to two days before you steam your mixiotes.
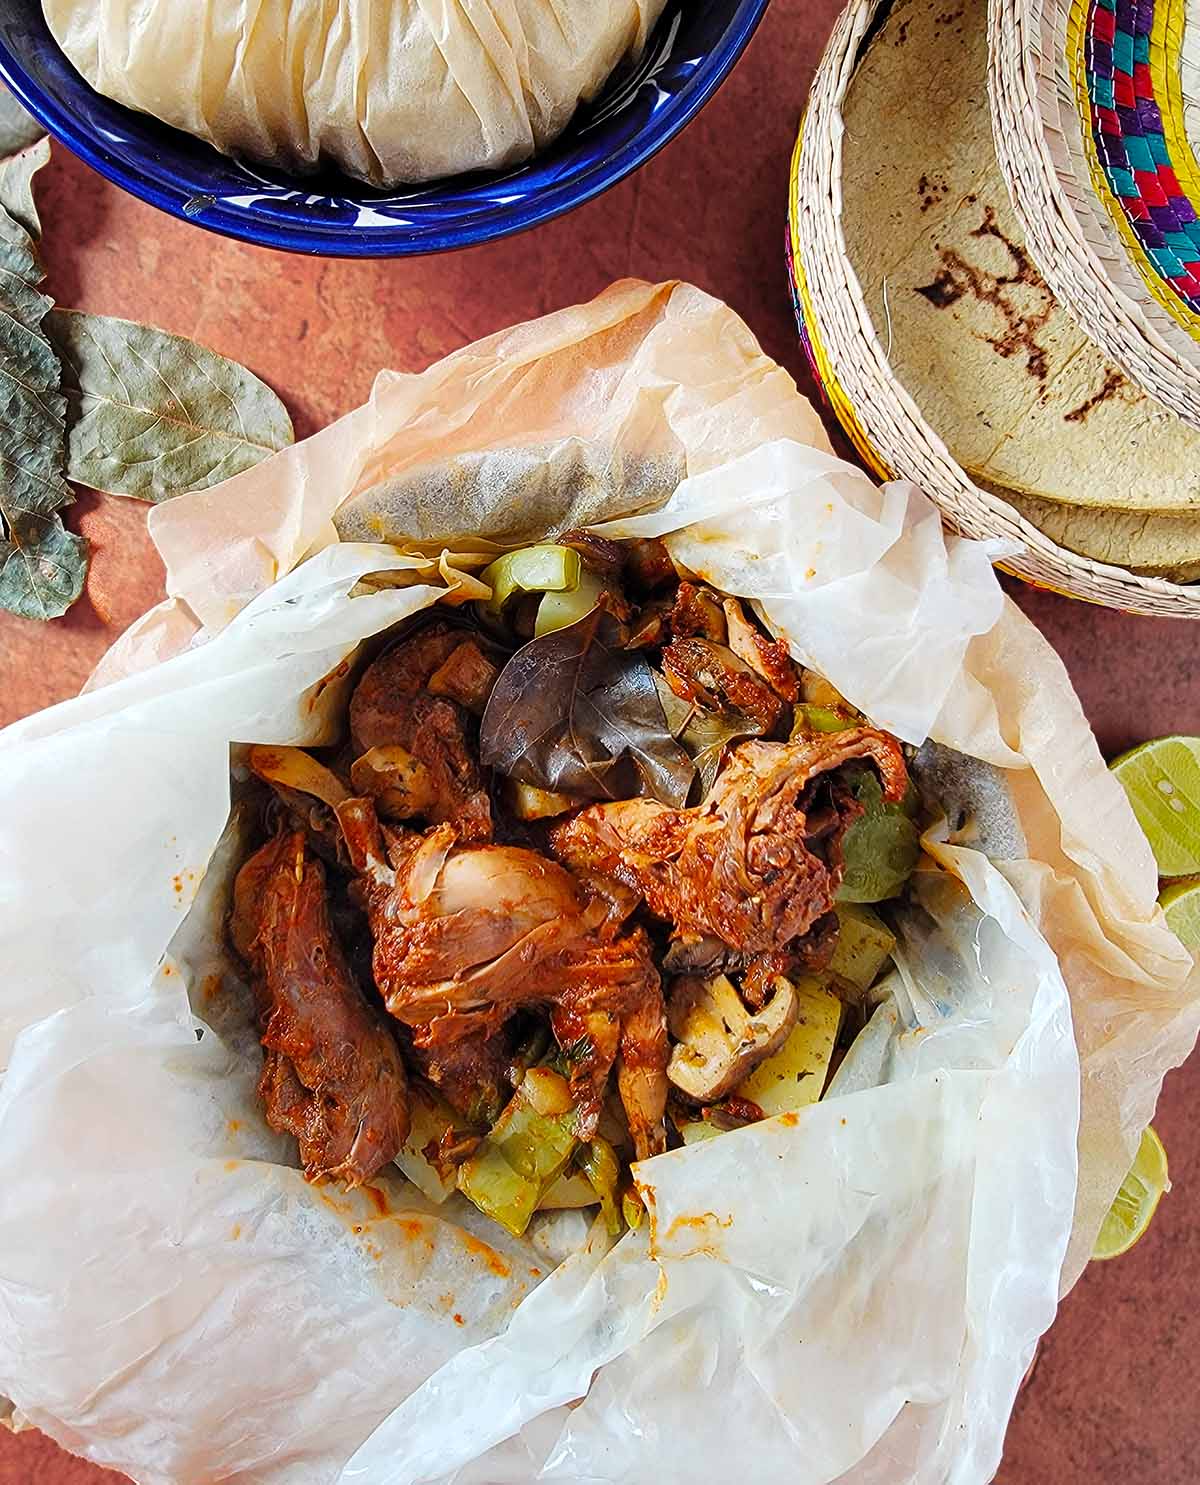
Serving and storing
You want to serve your mixiotes with lots of corn tortillas — always corn with this one, not flour — and maybe a soup to go as another course. My top choice would be something like caldo tlalpeno, which is from the same area of Mexico.
If you have leftovers, you can keep the bundles tied and resteam them, or you can dump them into a container. I really like eating mixiotes as leftovers cooked in a pan with torn-up, stale tortillas, a little like chilaquiles.
Leftovers will keep a week in the fridge, and they freeze well.
If you liked this recipe, please leave a ⭐️⭐️⭐️⭐️⭐️ rating and a comment below; I’d love to hear how everything went. If you’re on Instagram, share a picture and tag me at huntgathercook.
ADOBO
-
Set the dried chiles in a bowl and pour boiling water over them. Cover the bowl and let them rehydrate. Meanwhile, if you’re using the whole spices, toast them over medium-high heat in a dry pan until fragrant, then move them to a mortar and pestle. Now set the quarters of white onion and the unpeeled garlic in the pan to sear. You want both cut sides of the onion to blacken, and char marks on all sides of the garlic cloves.
-
Peel the garlic and set inside the mortar and pestle. Add a healthy pinch of salt, about 1 teaspoon. Grind all this into a paste. Add the lime juice or vinegar and use it to clean the mortar as you move the mixture to the bowl of a blender.
-
Add the chiles to the blender bowl, too. Roughly chop the onion and add it to the blender. Pour in water or broth and start blending. You want a puree about the thickness of barbecue sauce or house paint.
-
OPTIONAL STEP: Push the adobo through a fine-meshed strainer to remove bits of seed and skin from the chiles, which are not digestible.
-
BLENDER METHOD: If you don’t have a mortar and pestle, use ground spices and skip the toasting. Add all ingredients to a blender and puree.
MIXIOTES
-
You’ll likely have more adobo than you need; it keeps for weeks in the fridge. Coat the meat with some adobo and put this in a covered container for at least 4 hours, and up to 2 days. I prefer a full day.
-
When you are ready to make the bundles, soak the pieces of parchment paper for 10 minutes or so. Use this time to take the meat out of the fridge and chop vegetables.
-
Set some foil in a bowl. Set 2 pieces of wet parchment paper inside that. Divvy up the adobo-coated meat into 6 portions, and put a portion in the open bundle. Add some of the potatoes, nopales and mushrooms to the bundle. Sprinkle a little salt over it all. Add an avocado or bay leaf or two. Fold up the parchment paper into a bundle, and tie it off with twine or a twist tie. Fold the foil over the bundle to double seal it. Repeat with the remaining bundles.
-
Set a steamer insert into a large, lidded pot. Fill water up to the level of the steamer insert and set the temperature to high. Arrange the bundles on the steamer, cover the pot and steam for 1 hour and 15 minutes.
-
Carefully remove the bundles and set them on a board. Remove the foil and set each parchment bundle on a plate. Let your guests open them at the table. Serve with hot corn tortillas.
- If you don’t have a steamer insert for your pot, a great option is to set the bundles on corncobs, stripped of their kernels; this is done in Mexico. You could also put the bundles on a plate set over an empty can.
- For the chipotles, I prefer the tan chipotle meco, but morita is fine. If you can’t locate dried chipotles, use 2 canned ones with their adobo. Note. 2 chiles, not 2 cans.
- If you have smoked salt, especially smoked mesquite salt, use it.
- Here’s how to prep nopales. Prepped nopales can be made several days in advance.
If you are using tough game meats, like squirrel or pheasant or turkey thighs, simmer them in salted water for at least 1 hour before marinating, and 2 hours won’t hurt. That way they will be tender when you open the packets after steaming.
Calories: 281kcal | Carbohydrates: 39g | Protein: 22g | Fat: 6g | Saturated Fat: 2g | Polyunsaturated Fat: 2g | Monounsaturated Fat: 1g | Cholesterol: 43mg | Sodium: 74mg | Potassium: 1305mg | Fiber: 12g | Sugar: 14g | Vitamin A: 6990IU | Vitamin C: 32mg | Calcium: 107mg | Iron: 4mg
Nutrition information is automatically calculated, so should only be used as an approximation.
Source link: https://honest-food.net/mixiotes-recipe/ by Hank Shaw at honest-food.net
Wild Game Cooking
Fish Wings Recipe – How to Cook Walleye Wings

As an Amazon Associate I earn from qualifying purchases.
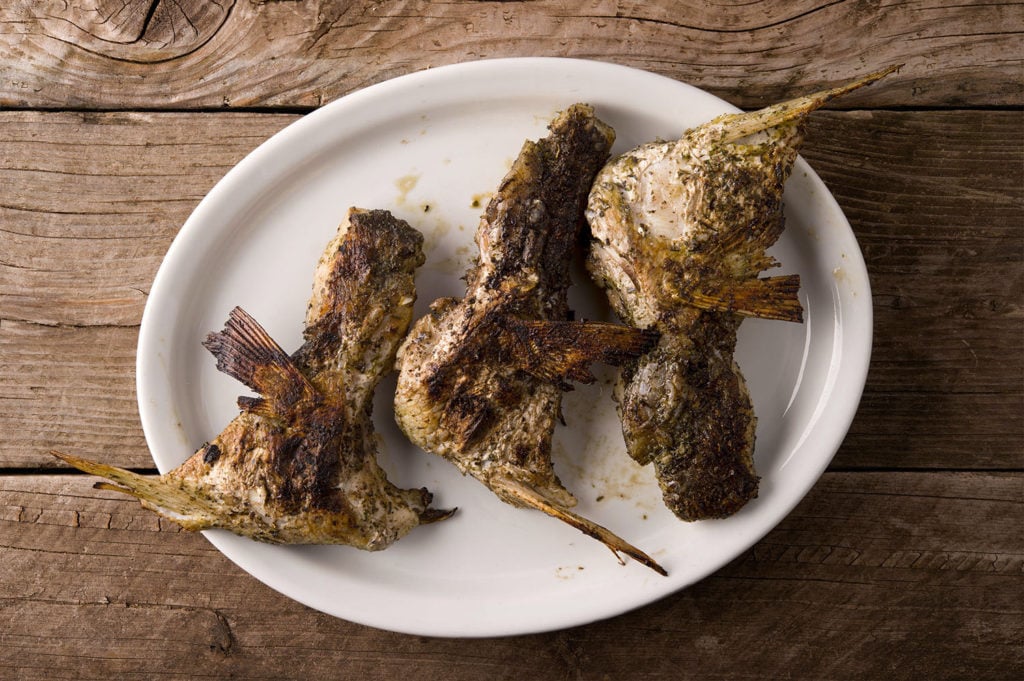
Here’s how to cut and cook fish wings, the collar and belly parts of fish like walleye, snapper and rockfish. Walleye wings are especially popular.
Using fish wings is a great way to get more out of the fish you bring home. They are fun to eat — it’s finger food, like chicken wings — the meat is texturally different from the rest of the fish, and it’s often fattier and richer. Wings, collars and throats are often the best part of a fish.
Depending on the fish and the region you live in, these can be called collars or throats, as in salmon or yellowtail collars, or snapper throats. Cod throats are a thing in New England. Walleye wings are the fish wings of choice in the Midwest.
The cuts are slightly different, but they are all from right behind the head of a fish, and usually include at least the pectoral or pelvic fins, and always the very front of the belly of the fish.
Generally speaking, collars include the arc of meat behind the gill plate and behind the fish’s head. Wings are below that, and include one or two sets of fins, while throats are only the bottom of the belly and may or may not include pelvic fins.
I use heavy-duty kitchen shears to remove them all. Many in the Upper Midwest simply remove walleye wings with the same electric knife they used to remove the fillets. Not being a fan of electric knives, I find the combination of a regular fillet knife plus shears works fine.
Most people cook fish wings either on the grill or they fry them. Both methods are great. I find that if you fry the wings, a very light coating of flour helps get things extra crispy because that flour will absorb any excess moisture; corn or potato starch is an excellent, gluten-free option.
Why leave the fins on? Well, they’re cool-looking, for starters. Second, once fried crispy, you eat the ends of the fins. Yes, you read that right. The ends of the fins get soft enough to eat, are ultra crunchy and not at all fishy in a bad way. You’ll thank me later.
Sauces for Fish Wings
Basically anything goes. I’ve seen anything from Lawry’s lemon pepper and butter to teriyaki sauce, to old-school Buffalo wing sauce to barbecue sauce. Here are some good ones for fish wings:
- I love tossing the cooked wings or collars with a honey mustard sauce, which is great on chicken wings, too.
- A Japanese ponzu sauce works fantastically, especially with salmon or trout collars.
- I marinate collars and fish wings sometimes in a ponzu-like sauce. I do this especially for hamachi kama, yellowtail collars. Any large collar works.
- A very simple, Mediterranean-style olive oil, herb, and lemon marinade is great, too. This is my go-to for all lean fish collars, like from striped bass or big snapper.
- Another good option is a straight-up barbecue sauce. I am fond of this Chinese-style char siu barbecue sauce.
Serving and Storing
Fish wings, collars, etc. don’t keep well. They’re oddly shaped, so while you can freeze them, they tend to break seal in vac bags, and their shapes lend themselves to air pockets however you store them, which leads to freezer burn.
My advice is celebrate your harvest with wings and collars right after fishing. Sure, they’ll keep several days in the fridge, but eat them fresh. You’ll like them better that way.
If you liked this recipe, please leave a ⭐️⭐️⭐️⭐️⭐️ rating and a comment below; I’d love to hear how everything went. If you’re on Instagram, share a picture and tag me at huntgathercook.
-
Optional Step: Mix 1/4 cup salt with 1 quart of water until the salt dissolves. Brine the fish wings or collars in this in the fridge for 4 to 12 hours. I like to do this before I go to bed, then drain off the brine when I wake up.
-
Alternatively, you can just salt the wings well and set aside while you heat about 1 inch of oil in a large pan. You can also use a deep fryer.
-
Lightly flour the fish wings, pressing it in. Set them aside as the oil heats.
-
If you have lots of wings to fry, set up a warming station in a 300°F oven by putting a cookie sheet in that has a cooling rack set above it. As the wings are fried, set them on this rack in the oven. This will keep them light and crispy so they don’t get soggy on paper towels.
-
When the oil hits 350°F, fry the wings, starting with skin side up. The wings will arc upwards. Press them down with your tongs or spatula until they relax and flatten, maybe 20 seconds. Fry until golden brown, about 4 to 8 minutes per side.
-
If you’re using a sauce, toss the wings in the sauce in a large bowl right before you serve them.
Calories: 243kcal | Carbohydrates: 12g | Protein: 42g | Fat: 2g | Saturated Fat: 0.3g | Polyunsaturated Fat: 1g | Monounsaturated Fat: 0.2g | Cholesterol: 98mg | Sodium: 123mg | Potassium: 953mg | Fiber: 0.4g | Sugar: 0.04g | Vitamin A: 91IU | Vitamin C: 2mg | Calcium: 39mg | Iron: 2mg
Nutrition information is automatically calculated, so should only be used as an approximation.
Source link: https://honest-food.net/fish-wings-recipe/ by Hank Shaw at honest-food.net
Wild Game Cooking
Dan Dan Noodles Recipe – How to Make Dan Dan Noodles

As an Amazon Associate I earn from qualifying purchases.
Dan Dan noodles are likely one of the few Sichuan dishes many Americans know about. Wheat noodles, tossed with sesame paste, soy and chile oil, topped with ground pork or some other meat. But this dan dan noodles recipe is a little different.
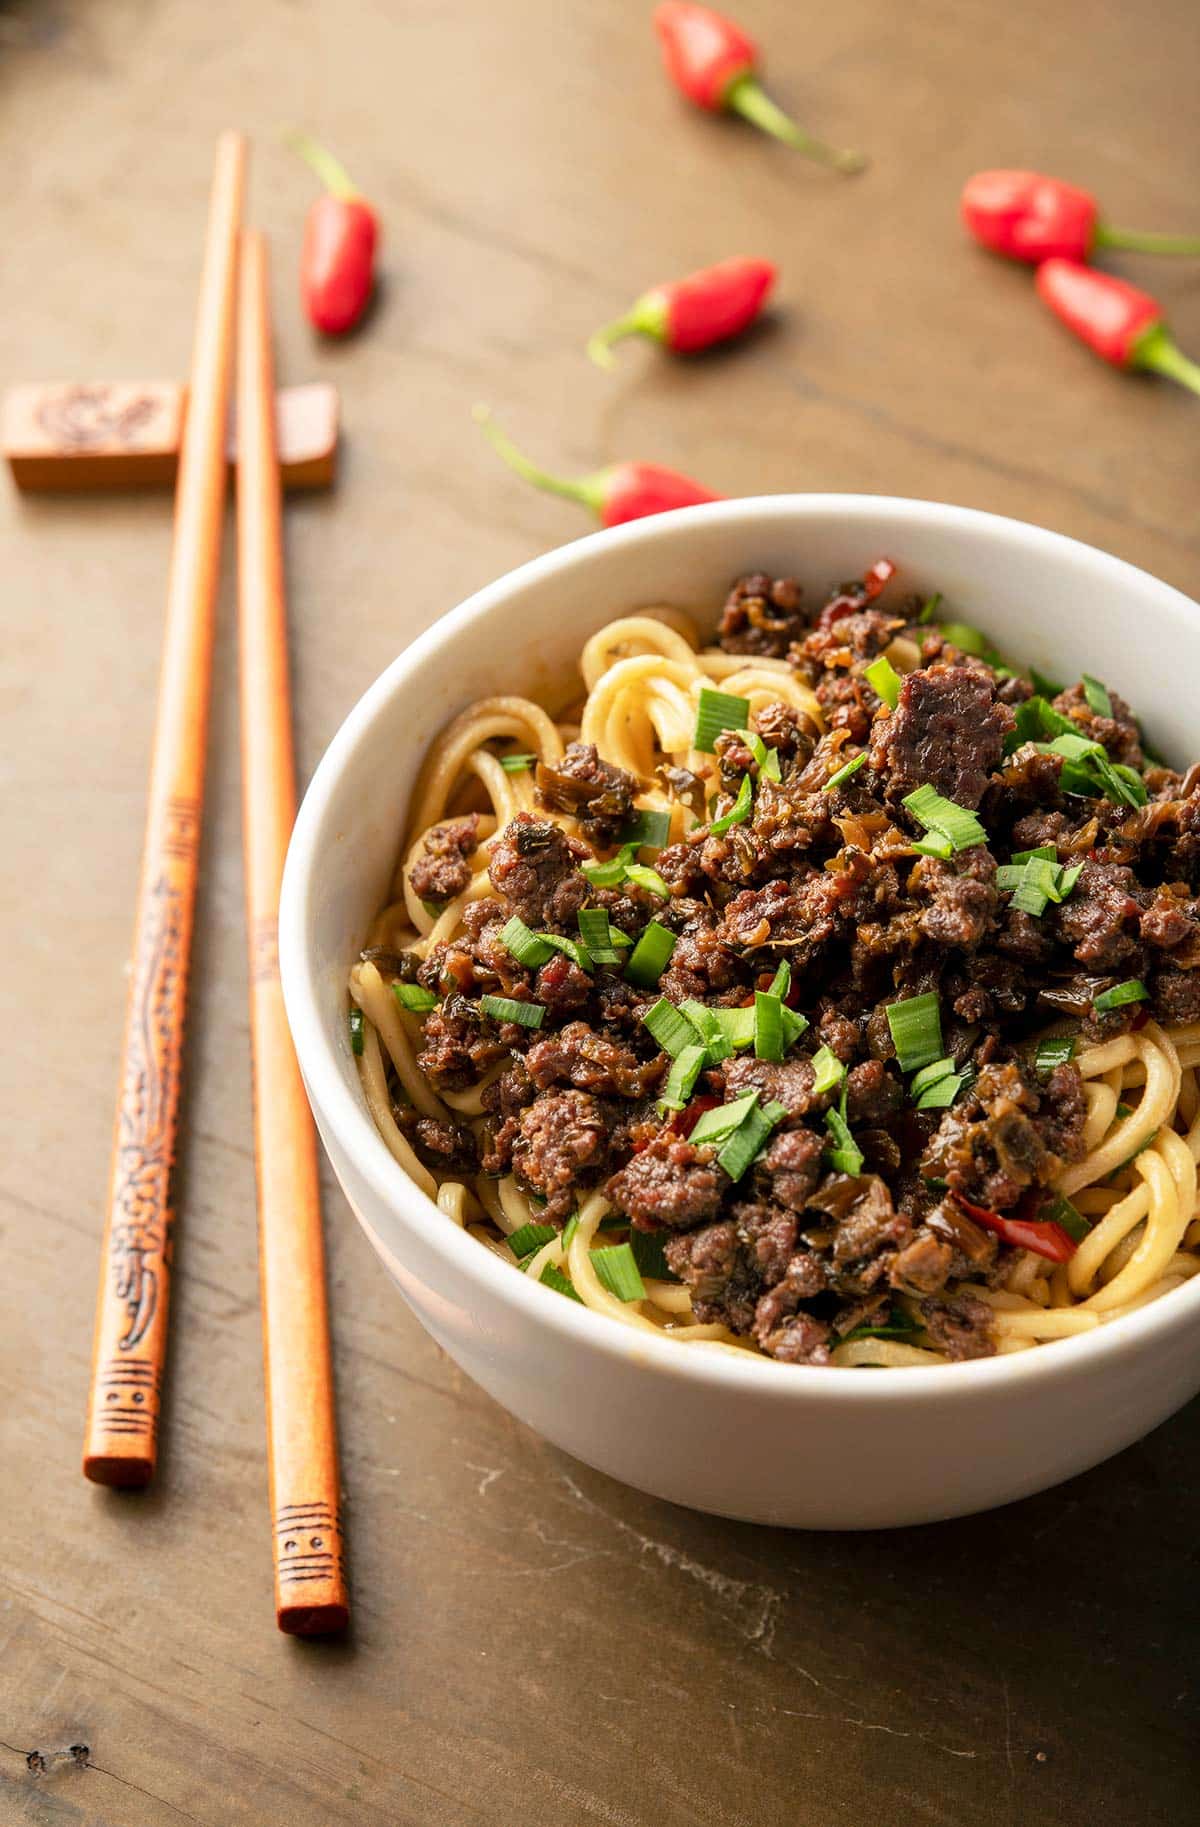
No matter which of the many variations you find, they are all street food, named for a shoulder pole used to carry the pots and ingredients for the noodles, and while its origins are in Sichuan, there are versions of it all over China, as well as here in the U.S.
So, I have to tell you that the first time I ate dan dan noodles, they were gross. It was like eating sweet peanut butter noodles. I swore off them as some nasty side note of Chinese cuisine, until I bought Fuchsia Dunlop’s book The Food of Sichuan. Dunlop, an Englishwoman, graduated from culinary school in Sichuan and is generally considered the authority on that province’s food in the English language. The book is amazing.
And in it are two dan dan noodles recipes, neither of which were sweet or peanut buttery. I later learned that what I disliked about what I’d eaten here was something Chinese chefs did to the dish to make it appeal to American palates. Go figure. Guess I don’t have a typical American palate.
I was especially struck by Mr. Xie’s dan dan noodles, which in Dunlop’s book use ground beef and not pork. The thought struck me immediately. Hey, I happen to have a lot of ground venison and duck in the freezer, and this would be awesome! For those of you squinching your noses, know that once you grind meat, it pretty much tastes like any other red meat.
Neither of the versions Dunlop includes in her book are soupy, which I like. American Chinese versions are often soupy, and it’s not my favorite with this flavor combination.
What are those flavors? Meaty, spicy but not overly so, rich from the sesame paste, a bit salty from both the soy, and the preserved mustard stems that are part of the traditional minced pork topping.

If you want to make this dan dan noodles recipe the way Dunlop does, you will need to get yourself to an Asian market. There are several unusual ingredients in it that are all vital to the flavor. That said, I will give you rough alternatives that are easier to find. It’ll taste different, but will be more accessible to most of you reading this. I’ll also link to online sources of these ingredients if you want to go that route.
- Chief among the special ingredients is Chinese preserved vegetable. Tianjin preserved vegetable or its cousin, yibin yacai. Both are long fermented mustard stems that, when you take them out of the packed or jar, look, well, not like mustard stems. But they are a great source of salty, savory flavor and are worth trying to get. Here’s where I found Tianjin Preserved Vegetable, and I bought Yibin yacai here. If you want to make real dan dan noodles you need one of these. But if you don’t feel like buying them, minced sauerkraut or kimchi will get you into the same galaxy, although they are not really that similar.
- Sesame paste. I know, you’re immediately thinking about buying tahini. And yes, if you have no Asian markets around, go for it. But the Chinese sesame paste doesn’t taste the same. but Dunlop gives us a recipe for making your own by toasting 2/3 cup of sesame seeds until nicely nutty and tan, then grind them well. Bring 5 tablespoons of neutral oil to 355°F and pour that over the ground, toasted seeds. You’ll be good to go.
- Chile oil. You can buy this in most supermarkets, or make it by pouring hot oil over ground hot peppers, with a spoonful of toasted sesame seeds. The general ratio is 4:1 oil to ground chiles, plus a small amount of toasted sesame.
- Sichuan peppercorn. No substitute. You need this. Asian markets all have it, and I buy my Sichuan peppercorns from Penzey’s. Yes, you can skip it, but there is no real alternative ingredient.
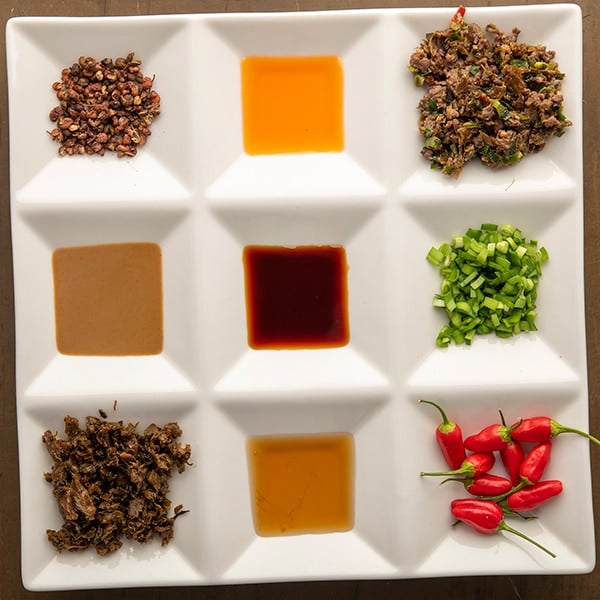
Everything else is easily obtainable from a supermarket. As for the noodles, you want Chinese wheat noodles, but Italian vermicelli is a decent substitute. Definitely check your supermarket’s Asian aisle, though, as they often have the Chinese noodles there.
Putting together an authentic dan dan noodles recipe requires a bit of forethought, but the cool thing is that once you have the ingredients and have made the topping, you are ready to make the noodles whenever you want for about a week, which is how long the topping will keep in the fridge.
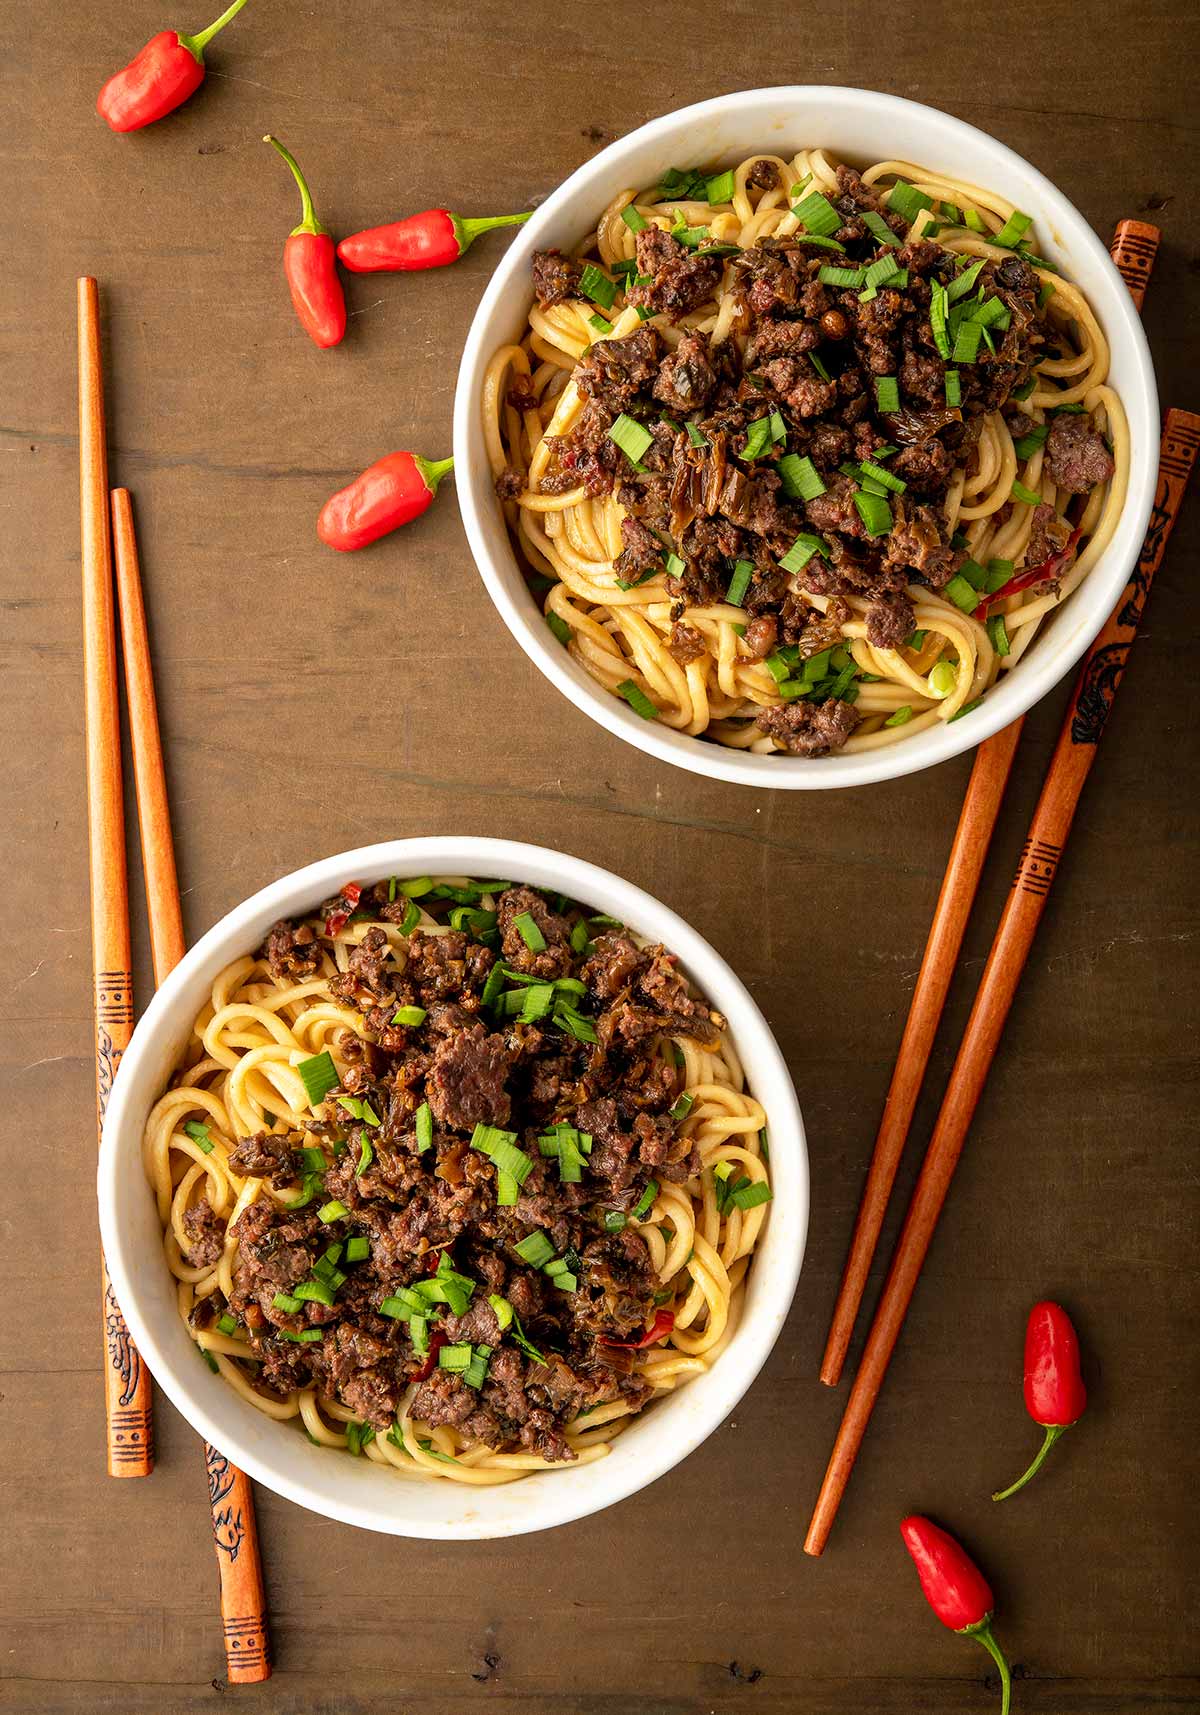
When it comes time to serve, the idea is to boil your noodles, make the topping while the water is heating, put a little of the sauce ingredients in each bowl, top with the meat, then let everyone mix and eat as they want.
If all this sounds like a long walk for a cup of coffee, keep in mind that I was skeptical, too. But once I made real deal dan dan noodles recipe, I was convinced. I think you will be, too.
Incidentally, I cook a lot of Sichuan food. You might want to try my recipes for fish fragrant chicken (or pheasant, or whatever), Sichuan rabbit with peanuts, or twice cooked pork.
If you liked this recipe, please leave a ⭐️⭐️⭐️⭐️⭐️ rating and a comment below; I’d love to hear how everything went. If you’re on Instagram, share a picture and tag me at huntgathercook.

TOPPING
-
Heat the peanut oil in a wok or heavy frying pan over high heat. When it’s hot, add the chiles and stir fry about 30 seconds, until you can smell them. Add the ground meat and stir to combine. Stir fry over very high heat until the meat has browned, then add the remaining topping ingredients, toss to combine and cook for another minute or so. Turn off the heat.
NOODLES
-
Before you even start the topping, get a large pot of water over a burner set over high heat. You want it to be boiling when you are done with the topping, although it’s not critical that both are done at the same time.
-
After the topping is ready and the water boiling, add the noodles and gently stir them so they don’t stick to each other. These typically only need maybe 3 minutes or so to be ready, but follow the directions on the package.
-
While the noodles are boiling, divide all the other noodle ingredients – except for the minced chives – among four deep bowls. To serve, give everyone some noodles over the sauce ingredients, add some topping and some chives, and let everyone stir and mix and eat!
The optional ingredients really make this dish, but if this is your first time, skip them because chances are you’ll need a special trip to buy them, or go via Amazon. That said, if you already like eating Dan Dan Noodles in restaurants, order the special ingredients.
Calories: 598kcal | Carbohydrates: 39g | Protein: 20g | Fat: 40g | Saturated Fat: 8g | Cholesterol: 37mg | Sodium: 1489mg | Potassium: 253mg | Fiber: 3g | Sugar: 2g | Vitamin A: 135IU | Vitamin C: 7mg | Calcium: 17mg | Iron: 4mg
Nutrition information is automatically calculated, so should only be used as an approximation.
Source link: https://honest-food.net/dan-dan-noodles-recipe/ by Hank Shaw at honest-food.net
Wild Game Cooking
Whitefish Salad Recipe – How to Make Whitefish Salad

As an Amazon Associate I earn from qualifying purchases.
A classic recipe for whitefish salad with sour cream, capers, celery and sweet onions. Smoked whitefish is the traditional fish to use, but most fish works. My secret? Mix both smoked and cooked, flaked fish in your salad.
I have a long history with whitefish salad. I grew up in New Jersey, and smoked whitefish and chubs were and are a staple at most Jewish delis. As a kid, I loved buying a chub and some good mustard and saltines and chowing down on that for lunch.
Whitefish salad was for sandwiches. It’s basically a tuna salad, which is why this recipe works even if you don’t have smoked whitefish. Many traditional versions are heavy on the mayo and kinda “wet,” which I don’t love.
This recipe is chunkier, and crunchier, and I split the mayo with sour cream. For the pictures, I used a combination of poached, flaked lake trout and smoked whitefish. A few tips to make your salad shine:
- Use a combination of smoked fish and either leftover fish, or, poach some fish, flake it out, and add to the bowl.
- For a serious pro tip, mix smoked fish with flaked crabmeat. It’s mad crazy good.
- Only use sweet onions, like vidalia or maui or walla walla sweets. It’s important. Skip the onion and go with chives or scallions if you can’t get sweet onions.
- If you don’t like capers, skip them. But use only the little ones, or chop the bigger ones.
- If you feel like it, add a tablespoon of mustard to the mix. It is a nice touch. If you do this, skip the horseradish.
- If you have an undying hatred of celery, or just want to mix it up, use a few tablespoons of pickle relish, or mince some pickles for that tang and crunch.

Serving and Storing Whitefish Salad
Whitefish salad is best eaten right after it’s made, but you can store it in a closed container in the fridge for a few days. It does not freeze well — although both smoked fish and cooked, flaked fish do freeze nicely.
I prefer serving whitefish salad as an open-faced sandwich on rye bread with something like thinly sliced radishes on top, as you see in the picture. It’s also amazing on a toasted bagel; “everything” bagel, for me.
A regular “tunafish sandwich” style sandwich works great, too, as does a “tuna melt” with cheese, if that’s your thing (it’s not mine). It’s also good just spread on Saltines or other crackers — Swedish crispbreads, like those made by Wasa, are an excellent option. I suppose you could make a whitefish salad wrap, too.
If you liked this recipe, please leave a ⭐️⭐️⭐️⭐️⭐️ rating and a comment below; I’d love to hear how everything went. If you’re on Instagram, share a picture and tag me at huntgathercook.
-
Put the fish in a bowl and check for tiny bones. Add the remaining ingredients and mix well. Tinker with the lemon juice, horseradish and, if you want it “wetter,” add more sour cream and/or mayo, 1 tablespoon at a time. Served chilled.
Once made, whitefish salad will keep up to 5 days in the fridge.
Calories: 250kcal | Carbohydrates: 4g | Protein: 21g | Fat: 16g | Saturated Fat: 4g | Polyunsaturated Fat: 7g | Monounsaturated Fat: 4g | Trans Fat: 0.03g | Cholesterol: 93mg | Sodium: 266mg | Potassium: 608mg | Fiber: 1g | Sugar: 3g | Vitamin A: 416IU | Vitamin C: 5mg | Calcium: 61mg | Iron: 1mg
Nutrition information is automatically calculated, so should only be used as an approximation.
Source link: https://honest-food.net/whitefish-salad-recipe/ by Hank Shaw at honest-food.net